Sunday 30 October 2011

Hamamelis & Kornblume Commission Process


Decided to find the bits and pieces of my process for another image.

This was a commission I did for Anbessa of his two characters, Hamamelis and Kornblume.

I started off with a series of tiny (ugly XD) drawings of my ideas for the poses and composition:
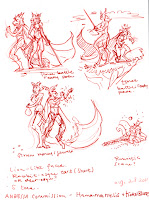

I decide to go with the doodle on the top left in the  first drawing.  Next, I scan it and load it into photoshop.  I like sketching in photoshop now, since it saves me a lot of time (and paper & printer ink (no need to print references this way)).  On top of the doodle, I start sketching my final lines:


This is what the sketch looked like more cleaned up. The composition was readjusted, as were the poses. Put everything more on a diagonal to make it more dynamic than what was roughed out above.


 I transfered the sketch onto paper and started shading it with a variety of graphite pencils.I felt the image needed an old story feel, so it would greatly benefit from visible pencil strokes.


Next, I decide to add a bit of colour since that tends to catch the eye more. For that "old" feel, I decide to add a yellowish sepia texture to the background to enhance that. This was a texture I made awhile back with watercolour, tea, salt, and alcohol:


But now it appears flat again. So it was time to reintroduce some light. I'm a fan of Royo's fantasy art, so pardon my god rays and mega sword shine X3


Levels are adjusted and now I consider it complete! :)
A rather simple process. Thank you for looking.

Friday 14 October 2011

Personal Art: Icons work in progress

Here are a few doodles I did for myself as a "warm up" before working on commissions. I've been in desperate need of a new icon/avatar for myself, so I started a few.

Heres a more relaxed look to my character: Her flowy hair is made of flame.  The line work is a bit bold here cuz I was working on a transparent layer, but as I added a white BG everything darkened, X3--Its also still in a bit of a rough stage.


Heres one that is actually part of a larger reference I've been working on on and off. She's got a bit of a snarl going on here :) --I'm thinking i'd like her to have some sort of symbol on her forehead, I used to have the sun symbol there but it looked like a bullseye target XD --I'd have to design something, like another symbol- or a lovely head dress.


I think its important for artists to try and draw for themselves from time to time. I absolutely enjoy drawing for others, it is extremely fun. However, it is still important to express your own creations from your brain on paper whenever it is possible. I often feel "refereshed" to go back to work on commissions whenever I do this for myself.


Thank you for looking!

Tuesday 11 October 2011

Various Doodles

Practice with sepia fabercastell pitt pens. Ink doodle of a young tiger done a little whiles ago. Based on google imagesfor study purposes.

The next one is a doodle of Ammut. Tried to get a cool design for her.


The last one is from the beginning of summer. I tried to draw myself  XD, and underneath is your typical lioness sketch.


Thanks for looking!

Monday 3 October 2011

Sareena's Commission Process

Hello everyone! I figured I ought to kick off this blog /somehow/ , so I  decided to start off by posting a few of my older commission step by steps. What is posted here is what I remembered to save to show people at the time, haha. So some might not have exactly each step I went through to create the drawing. When something is missing I will mention it.  Bear with me, I hope to have more complete step by steps with my next paintings.

In the future, I intend on also posting studies, tutorials, concept art, etc.


Sareena's Feline Form: The Creation of "Moon Gaze"

I first start off by doing tons of mini drawings of the character called "thumbnails". I  do this proportional to the final format of the drawing as much as possible. It gives me a sense of direction and composition for the final. These drawings should not take you too long, and are not meant to look pretty at all!

This was the selected thumbnail:


Its also a good idea to add tonal values to indicate depth...i didnt do it so well here X3 (im bad, i dont follow my own rules. What a great example I am! X3)

From the Thumbnail, a rough sketch is created: 


I notice a few things are off (and fix them the best I can) and decide to refine the background even more (I fix the moon and clouds so it works better in a composition). Once I refine the sketch and I'm satisfied, I transfer it with a sepia  faber castell brand colored pencil onto arches satin finish watercolor paper. *These pencilsare waterproof (they will not wash away when you do your washes).

This is what the transfer looks like before being painted:


Before painting, I highly recommend scanning your sketch or transfer, and doing some tonal and color studies in photoshop (sadly this was the step I forgot to save to show). This way, you decide on how you want the colors and lighting to look like in advance, rather than "going in blind" on the final painting. You will see that you will have more confidence, make less mistakes and avoid having to restart your painting.


 With my color and lighting studies as a guide, I lay down my watercolor washes gradually ( I can do a more detailed tutorial on this seperately sometime, if there is enough demand.):


Once I'm satisfied with the base I decided to add some colored pencil details in the fur. I follow the form as much as possible with my strokes. I refine my edges, lighting and add whiskers with white acrylic paint (or gouache).


Finished!

Again, forgive my lack of extremely detailed explanations for now. I can make a tutorial should anyone be interested. Feel free to ask questions if you have any!